ZFighter Issues List Workflow
After processing a scene, the Issues List displays the Issues found.
Each Issue in the Issues List is a single instance of potential z-fighting, either between pairs of GameObjects or within a single GameObject.
The workflow for ZFighter consists of the following:
Here is an example workflow for a given scene:
- Process the scene. It might seem like there are a lot of Issues! Don't worry, ZFighter has tools to help manage the workload.
- Navigate through the Scene view and note the location and size of Issues overall. Sort the
Issues Listin a few ways to see what common or duplicate Issues might be. - Re-Process with different Settings if necessary.
- Start to investigate individual Issues, and groups of similar Issues, and triage them with Notes, Priority, and Status.
- Identify which Issues are inside prefabs and make sure to address these by editing the prefab itself.
- Consider using Auto-Dismiss to get rid of very small Issues.
- Issues that are outside the intended camera view can be marked as
Won't Fix. - Select multiple Issues to batch-edit the Status, Notes, and Priority.
- Fix an Issue by moving GameObjects, editing the Mesh, or covering the overlap area with another object.
- Re-Check the Issue(s) to ensure that any fixes worked.
- Mark the Issue as
DismissedorWon't Fixto resolve. - After resolving a few Issues, process the scene again to get fully refreshed data. Sometimes fixes introduce new Issues!
Investigate Issues
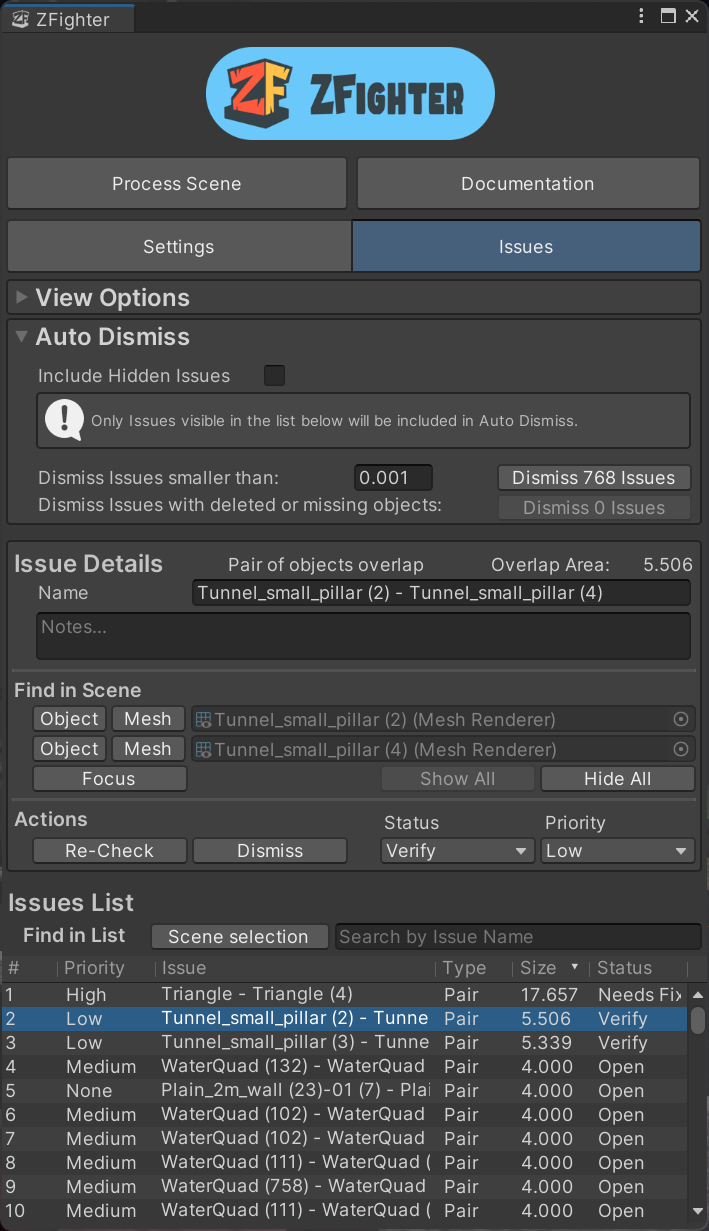
Issue Details
The Issue Details section displays information and actions for the selected Issues. This includes the Renderers that caused the z-fighting, and editable Status, Name, Notes, and Priority properties. For each Issue, note the Issue Type and the Overlap Area. Larger area correlates to being more visible, but this depends on the project and expected camera path. Some Issues with a small overlap area may still occur in obvious locations to the camera.
Find and Select Issues
Clicking on an Issue in the Issues List displays that Issue in the Issue Details and selects the GameObject(s) involved in the Hierarchy. ZFighter supports both a visual workflow, or a list-based workflow. You can select Issues in a few ways:
- Select an Issue from the Issues List by clicking it. Multiple Issues can be selected for batch-editing.
- Quick-select from Scene view. Click the front face of an Overlap to select a single Issue associated with that GameObject. There may be multiple Issues with any given GameObject, so this is not inclusive. Note that this is based on selection and you must select a GameObject with a Renderer involved with the Issue. If a parent GameObject is selected, click again until the child is properly selected.
- Select one or more GameObjects either in the Scene view or in the Hierarchy.
Then click the
Scene Selectionbutton to get an inclusive list of all Issues involving the selected objects. Searching by Mesh, Sprite, or Material asset also works by selecting Mesh, Sprite, or Material assets in the Project window before clicking theScene Selectionbutton. - Search by Issue Name. Issues are named by the GameObjects involved by default. This will find all Issues related to a single name this way quickly. These names are also editable, which might be useful for future searches.
Navigating to Objects
Tip: For better visibility, try toggling the Lighting setting in Scene View, and using Shaded Wireframe.
The Focus option moves the Scene view to the Issue's Overlap area and hides all other Overlaps from the Scene View.
- To Focus, click the
Focusbutton in the Issue Details: Find In Scene section, or double-click an Issue in the Issues List. - In order to stop focusing on an Issue, either select a different Issue in the Issues List, or click the
Show Allbutton with the Issue Details: Find In Scene section. - If the Overlap in the Scene view is distracting, click the
Hide Allbutton. - The
Objectbutton selects the relevant GameObject in the Scene View and Hierarchy. - The Asset button selects the relevant Asset for the Renderer in the Project window.
Depending on the Renderer type, the button name displays as
Meshfor Mesh Assets andSpritefor Sprite Assets.
Triage and Organize
Tip: Sort the Issues List variously by Type, Name, and Size and look for duplicate and similar Issues. Batch-select them and assign Status, Priority, Notes to speed up organization.
There are multiple properties in the Issue Details to help organize the Issues found. As you investigate Issues, edit the information in the Issue Details section to manage and track progress.
- Each Issue can be given a custom Name. The default name is the names of the GameObjects involved with the Issue.
- The Notes property can be used to track of information needed to resolve the Issue or communicate to collaborators.
- The Priority property can be used to sort Issues by importance. The options are None, Low, Medium, and High.
- The Status property can be used to track the type and progress of individual Issues.
The provided Status properties are:
- Open - This is the default status of any new Issue
- Needs Fix - Use this to mark an issue as a known problem
- Scene Issue - This may be useful to identify that this issue is not a Mesh or Prefab Issue but needs work in the Scene
- Prefab Issue - If a problem is inside a prefab, the fix should be applied to the prefab, not the Scene. Use this to note that fix as there are likely to be multiples if prefabs are reused, and this will fix Issues across Scenes.
- Mesh Issue - If the problem is within a single Renderer, the only fix might require editing the mesh in an outside 3D modelling tool.
- Verify - Use this for Issues that are considered fixed but require a new Process or Re-Check, or that might require another form of checking before marking Dismissed.
- Won't Fix - This is primarily used for Issues that are not visible to the camera, such as underneath floors, blocked by other geometry, or otherwise will not cause a problem.
- Dismissed - This is for any Issue considered Resolved. Auto-Dismiss will assign this status.
It is also useful to search for Issues. This searches by Issue or GameObject name, but can also be used to search for specific GameObjects, Meshes, or Sprites.
Fix Issues
Not every Issue identified with this tool will cause a visual z-fighting artifact. Many can be marked Won't Fix to ignore. Auto-Dismiss will quickly Dismiss all Issues under a set size.
For the Issues that do require action, the object must move, edit, scale, cover, etc so the finished product will not have artifacts visible to the user.
Most z-fighting is caused by placement errors. The simplest fix is to move one of the objects.
However, the Overlap will not move with the mesh. Apply the fix and then choose Re-Check or Process Scene to have the Overlap update.
Some fixes will require a bit of creativity to resolve. See Fixing Tips for other ways to fix various Issues.
Re-Check and Resolve Issues
The Dismiss button is a quick way to mark an Issue as resolved.
As individual Issues have been resolved, the Issues List will show less Issues.
The default settings will hide any Issues with the Dismissed and Won't Fix status, preventing unimportant Issues from being displayed while working.
Which Issues are displayed in the Issues List can be changed in the Show/Hide Properties Section.
While Issues with Dismissed or Won't Fix status are considered resolved, they will still be calculated in future full scene processing operations.
Individual Issues can also be tested again to see if it has been resolved.
Click on the Re-Check Issue button in the Issue Details Action section.
This will run ZFighter only with the Renderers involved in the selected Issues.
Since Re-Check Issue only checks the selected Issues, other Issues may no longer be correct.
It is recommended to perform a full scene process after large scene edits or many Re-Check Issue operations to ensure that all Issues have current Overlap Area size.
Processing Again
After large scene or mesh edits, it is recommended to process the entire scene again by clicking the Process Scene button.
All Issue data will be kept, but each Issue will have its overlap area updated.
The default Detection Settings may not catch all z-fighting in the scene.
It may be useful to increase the Z-fighting Distance and Z-fighting Angle.
Since doing so will increase the processing time, ZFighter Volumes can be used to process the scene in parts.
To learn more about how to use Volumes, read the working with Volumes guide.
See Processing Tips for tips relating to processing times.
Cleaning Up
ZFighter scene objects are tagged Editor-Only, so they are not included in builds by default. If more changes are expected, keep ZFighter in the scene to easily process again.
But if it is desirable to process the scene from scratch with default settings, or to clean up after all Issues have been resolved, all ZFighter data can be deleted.
At the bottom of the Settings tab within the ZFighter Window, click the Clear Issues button to remove all data on Issues, but keep ZFighter processing settings for the scene.
To remove all custom settings, Volumes, and Issue data, click the Clear All Data button.
If you want to remove ZFighter from the project, it is recommended to open each scene that has Zfighter data, use the Clear All Data button, and then use the Package Manager window to remove the asset package. If the package is removed without clearing the scenes, the ZFighter data objects will remain. These may be manually deleted, however.